Virtual Mail Server
How to establish a complete virtual user mail system

Postfix will be our MTA (mail transfer agent) to send and recieve encrypted mail.
Virtual mail users will be managed with PostfixAdmin, a web interface for Postfix.
An unlimited number of domains and domain (specific) user names may be managed and will be stored in a SQL database.
Dovecot will be our MDA (mail delivery agent) to access email via secure IMAP from Roundcube,
a web-based MUA (mail user agent) or an desktop MUA like Evolution.
All encrypted mail communications will be secured with a TLS certificate.
SPF (Sender Policy Framework) will ensure that the only verified servers/IP addresses may send mail from a given domain
and DKIM (DomainKeys Identified Mail) will sign all outgoing messages with verification keys.
This measures prevent our outgoing mail ending up in the junk box or our server being blacklisted for spam entirely.
DMARC (Domain-based Message Authentication, Reporting and Conformance) ensures that both DKIM and SPF are properly enforced.
Amavis, Spam-assassin will fiter messages for SPAM and ClamAV will be used for virus protection.
Postfix
│ └── PostfixAdmin
├── Dovecot
├──┬── SPF
│  ├── DKIM
│  └── DMARC
├── Amavis
│    ├── SpamAssassin
│    └── ClamAV
└── Roundcube
Postfix
Install Postfix and MariaDB packages.
pacman -Syu postfix mariadb postfix-mysql ca-certificates
Configure Postfix
Uncomment and add or modify default Postfix settings.
mail_owner = postfix
myhostname = mail.wildw1ng.com
mydomain = wildw1ng.com
myorigin = $mydomain
inet_interfaces = all
mydestination = $myhostname, localhost.$mydomain, localhost
mynetworks = 10.0.0.0/22, 127.0.0.0/8
relayhost =
alias_maps = hash:/etc/postfix/aliases
alias_database = $alias_maps
home_mailbox = Maildir/
smtpd_banner = $myhostname ESMTP $mail_name (Arch Linux)
inet_protocols = ipv4
append_dot_mydomain = no
mailbox_size_limit = 0

relay_domains = $mydestination
virtual_alias_maps = proxy:mysql:/etc/postfix/virtual_alias_maps.cf,proxy:mysql:/etc/postfix/virtual_alias_domains_maps.cf
virtual_alias_domains = proxy:mysql:/etc/postfix/virtual_alias_domains.cf
virtual_mailbox_domains = proxy:mysql:/etc/postfix/virtual_mailbox_domains.cf
virtual_mailbox_maps = proxy:mysql:/etc/postfix/virtual_mailbox_maps.cf
virtual_mailbox_base = /home/vmail
virtual_mailbox_limit = 512000000
virtual_minimum_uid = 5000
virtual_transport = virtual
virtual_uid_maps = static:5000
virtual_gid_maps = static:5000
local_transport = virtual
local_recipient_maps = $virtual_mailbox_maps
transport_maps = hash:/etc/postfix/transport

# Secure SMTP (receiving)
smtpd_tls_security_level = may
smtpd_use_tls = yes
smtpd_tls_cert_file = /etc/letsencrypt/live/mail.wildw1ng.com/fullchain.pem
smtpd_tls_key_file = /etc/letsencrypt/live/mail.wildw1ng.com/privkey.pem
smtpd_tls_CApath = /etc/ssl/certs
smtpd_sasl_auth_enable = yes
smtpd_sasl_type = dovecot
smtpd_sasl_path = /var/run/dovecot/auth-client
smtpd_recipient_restrictions = permit_mynetworks, permit_sasl_authenticated, reject_unauth_destination, check_policy_service unix:private/policy-spf
smtpd_relay_restrictions = permit_mynetworks, permit_sasl_authenticated, reject_unauth_destination
smtpd_sasl_security_options = noanonymous
smtpd_sasl_tls_security_options = $smtpd_sasl_security_options
smtpd_tls_auth_only = yes
smtpd_tls_received_header = yes
smtpd_sasl_local_domain = $mydomain
smtpd_tls_loglevel = 1

# Enable SASL authentication
smtp_sasl_auth_enable = yes
# Disallow any methods that do allow anonymous authentication
smtp_sasl_security_options = noanonymous
# Define the sasl_passwd file location
smtp_sasl_password_maps = hash:/etc/postfix/sasl/sasl_passwd

# Enable STARTTLS encryption
smtp_use_tls = yes

# Secure SMTP (sending)
smtp_tls_security_level = may
# smtp_tls_security_level = secure
# smtp_enforce_tls = yes

# Enable TLS logging
smtp_tls_loglevel = 1

# Discovering servers that support TLS
smtp_tls_note_starttls_offer = yes

non_smtpd_milters   = unix:/run/opendkim/opendkim.sock, unix:/run/opendmarc/opendmarc.sock
smtpd_milters       = unix:/run/opendkim/opendkim.sock, unix:/run/opendmarc/opendmarc.sock

policy-spf_time_limit = 3600s

# Disable VRFY (verify)
disable_vrfy_command = yes

# Block spam using DNS blacklists
smtpd_client_restrictions = permit_mynetworks, permit_sasl_authenticated, reject_rbl_client bl.spamcop.net
# reject_rbl_client zen.spamhaus.org

smtpd_sender_restrictions = permit_mynetworks, permit_sasl_authenticated, reject_unknown_sender_domain, reject_unknown_reverse_client_hostname, reject_unknown_client_hostname

# Require the client to provide a HELO/EHLO hostname
smtpd_helo_required = yes
smtpd_helo_restrictions = permit_mynetworks, permit_sasl_authenticated, reject_invalid_helo_hostname, reject_non_fqdn_helo_hostname, reject_unknown_helo_hostname
smtp_helo_name = $mydomain

# Unsubscibe header
header_checks = regexp:/etc/postfix/list_unsub_header

# Protecting against forged sender addresses
smtpd_sender_login_maps=mysql:/etc/postfix/virtual_alias_maps.cf

# Hide the sender's IP and user agent in the Received header
smtp_header_checks = regexp:/etc/postfix/smtp_header_checks
# ==========================================================================
# service type  private unpriv  chroot  wakeup  maxproc command + args
#               (yes)   (yes)   (no)    (never) (100)
# ==========================================================================
smtp      inet  n       -       n       -       -       smtpd
  -o content_filter=amavisfeed:[127.0.0.1]:10024

submission inet n       -       n       -       -       smtpd
  -o syslog_name=postfix/submission
  -o smtpd_tls_security_level=encrypt
  -o smtpd_sasl_auth_enable=yes
  -o smtpd_tls_auth_only=yes
  -o smtpd_reject_unlisted_recipient=no
  -o smtpd_recipient_restrictions=permit_sasl_authenticated,reject
  -o smtpd_relay_restrictions=permit_sasl_authenticated,reject
  -o milter_macro_daemon_name=ORIGINATING
  -o syslog_name=postfix/submission
  -o smtpd_tls_wrappermode=no
  -o smtpd_tls_security_level=encrypt
  -o smtpd_sasl_auth_enable=yes
  -o content_filter=amavisfeed:[127.0.0.1]:10024
  -o smtpd_sender_restrictions=reject_sender_login_mismatch,permit_sasl_authenticated,reject

policy-spf  unix  -       n       n       -       0       spawn
        user=nobody argv=/usr/bin/policyd-spf

amavisfeed      unix  -    -       n       -       2       smtp
 -o smtp_data_done_timeout=1200
 -o smtp_send_xforward_command=yes
 -o disable_dns_lookups=yes
 -o max_use=20

127.0.0.1:10025 inet n  -       y       -       -       smtpd
 -o content_filter=
 -o smtpd_delay_reject=no
 -o smtpd_client_restrictions=permit_mynetworks,reject
 -o smtpd_helo_restrictions=
 -o smtpd_sender_restrictions=
 -o smtpd_recipient_restrictions=permit_mynetworks,reject
 -o smtpd_data_restrictions=reject_unauth_pipelining
 -o smtpd_end_of_data_restrictions=
 -o mynetworks=127.0.0.0/8
 -o smtpd_error_sleep_time=0
 -o smtpd_soft_error_limit=1001
 -o smtpd_hard_error_limit=1000
 -o smtpd_client_connection_count_limit=0
 -o smtpd_client_connection_rate_limit=0
 -o receive_override_options=no_header_body_checks,no_unknown_recipient_checks,no_milters
 -o local_header_rewrite_clients=
Create unprivileged user
For security reasons, we create a new user vmail to store the mails.
useradd -u 5000 -g vmail -s /usr/bin/nologin -d /home/vmail -m vmail
We use a gid and uid of 5000 in both cases so that we do not run into conflicts with regular users.
All our mail will be stored in /home/vmail.
MariaDB
We have to initialize the MariaDB data directory and create the system tables in the mysql database before starting the mariadb.service.
mariadb-install-db --user=mysql --basedir=/usr --datadir=/var/lib/mysql
Enable and start mariadb.service.
Improve the initial security of our MariaDB installation with recommended security measures,
such as removing anonymous accounts and removing the test database.
When prompted to “Switch to unix_socket authentication” enter n for No.
mysql_secure_installation
By default, MySQL will listen on the 0.0.0.0 address, which includes all network interfaces.
We have to restrict MySQL to listen only to the loopback address.
[mysqld]
#bind-address = localhost
bind-address = 127.0.0.1
Restart mariadb.service.
systemctl restart mariadb
Postfix database initialization
We have to create an empty database and give the corresponding user permission to use the database.
postfix_user will have read/write access to the database postfix_db using POSTFIXDBPASSWORD as password.
CREATE DATABASE postfix_db;
GRANT ALL ON postfix_db.* TO 'postfix_user'@'localhost' IDENTIFIED BY 'POSTFIXDBPASSWORD';
We have to set up the necessary configurations for postfix to interact with the database for all its other transport needs.
/etc/postfix/virtual_alias_maps.cf
user = postfix_user
password = POSTFIXDBPASSWORD
hosts = localhost
dbname = postfix_db
table = alias
select_field = goto
where_field = address
/etc/postfix/virtual_mailbox_domains.cf
user = postfix_user
password = POSTFIXDBPASSWORD
hosts = localhost
dbname = postfix_db
table = domain
select_field = domain
where_field = domain
/etc/postfix/virtual_mailbox_maps.cf
user = postfix_user
password = POSTFIXDBPASSWORD
hosts = localhost
dbname = postfix_db
table = mailbox
select_field = maildir
where_field = username
/etc/postfix/virtual_alias_domains_maps.cf
user = postfix_user
password = POSTFIXDBPASSWORD
hosts = localhost
dbname = postfix_db
query = SELECT goto FROM alias,alias_domain WHERE alias_domain.alias_domain = '%d' and alias.address = CONCAT('%u', '@', alias_domain.target_domain) AND alias.active = '1' AND alias_domain.active='1'
/etc/postfix/virtual_alias_domains.cf
user = postfix_user
password = POSTFIXDBPASSWORD
hosts = localhost
dbname = postfix_db
query = SELECT alias_domain FROM alias_domain WHERE alias_domain='%s' AND active = '1'
Only postfix should have access rights to these files, as they contain passwords.
chown root:postfix -R /etc/postfix/
chmod 640 /etc/postfix/virtual_*
We have to run postmap on transport to generate its database.
postmap /etc/postfix/transport
Dovecot
Install Dovecot package.
Create the dovecot configuration directory and configuration files.
/etc/dovecot/dovecot.conf
protocols = imap
listen = *
auth_mechanisms = plain login
passdb {
    driver = sql
    args = /etc/dovecot/dovecot-sql.conf
}
userdb {
    driver = sql
    args = /etc/dovecot/dovecot-sql.conf
}

service auth {
    unix_listener auth-client {
        group = postfix
        mode = 0660
        user = postfix
    }
    user = root
}


mail_home = /home/vmail/%d/%n
mail_location = maildir:~

ssl_dh = </etc/dovecot/dh.pem

ssl_cert = </etc/letsencrypt/live/mail.wildw1ng.com/fullchain.pem
ssl_key = </etc/letsencrypt/live/mail.wildw1ng.com/privkey.pem
/etc/dovecot/dovecot-sql.conf
driver = mysql
connect = host=localhost dbname=postfix_db user=postfix_user password=POSTFIXDBPASSWORD
# It is highly recommended to not use deprecated MD5-CRYPT. Read more at http://wiki2.dovecot.org/Authentication/PasswordSchemes
default_pass_scheme = SHA512-CRYPT
# Get the mailbox
user_query = SELECT '/home/vmail/%d/%n' as home, 'maildir:/home/vmail/%d/%n' as mail, 5000 AS uid, 5000 AS gid, concat('dirsize:storage=',  quota) AS quota FROM mailbox WHERE username = '%u' AND active = '1'
# Get the password
password_query = SELECT username as user, password, '/home/vmail/%d/%n' as userdb_home, 'maildir:/home/vmail/%d/%n' as userdb_mail, 5000 as  userdb_uid, 5000 as userdb_gid FROM mailbox WHERE username = '%u' AND active = '1'
# If using client certificates for authentication, comment the above and uncomment the following
#password_query = SELECT null AS password, ‘%u’ AS user
Set permissions.
chown dovecot:dovecot /etc/dovecot/*
Remove the old temporary SSL parameters file.
rm /var/lib/dovecot/ssl-parameters.dat
We are required to provide DH parameters.
Generate a new DH parameters file (this might take a long time).
openssl dhparam -out /etc/dovecot/dh.pem 4096
Enable Dovecot debug logging.
/etc/dovecot/dovecot.conf
auth_verbose = yes
auth_verbose_passwords = no
auth_debug = yes
auth_debug_passwords = yes
mail_debug = yes
verbose_ssl = yes
Testing IMAP.
openssl s_client -connect 127.0.0.1:993
a login admin@wildw1ng.com PASSWORD
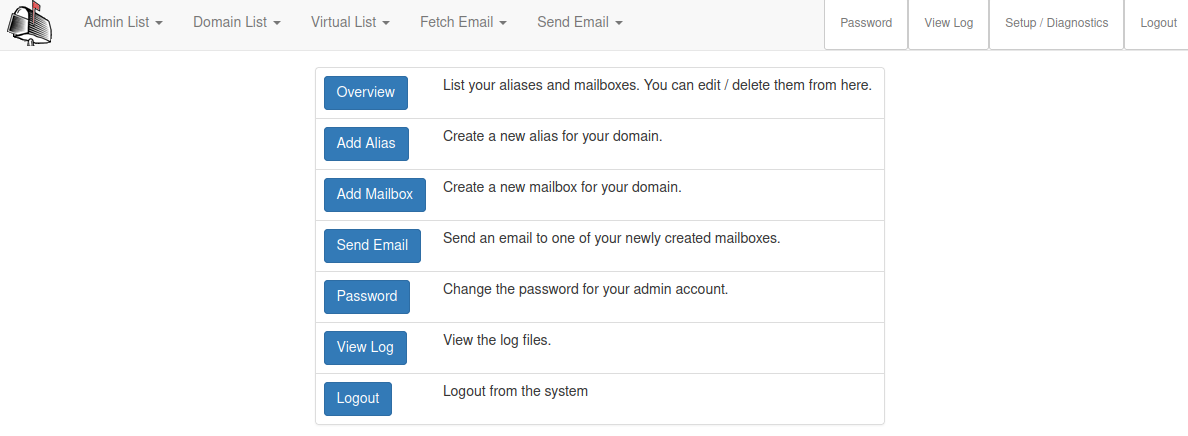
PostfixAdmin
Web interface for Postfix used to manage mailboxes, virtual domains and aliases.
Install PostfixAdmin, Apache and PHP packages.
pacman -Syu postfixadmin apache php-fpm php-imap
Apache HTTP Server configuration
/etc/httpd/conf/httpd.conf
ServerName localhost
Listen 0.0.0.0:80

# php-fpm, an alternative PHP FastCGI implementation with some additional features (mostly) useful for heavy-loaded sites
LoadModule proxy_module modules/mod_proxy.so
LoadModule proxy_fcgi_module modules/mod_proxy_fcgi.so

# SSL
LoadModule ssl_module modules/mod_ssl.so
LoadModule socache_shmcb_module modules/mod_socache_shmcb.so
LoadModule rewrite_module modules/mod_rewrite.so

# Virtual hosts
Include conf/extra/httpd-vhosts.conf

# PostfixAdmin
Include /etc/httpd/conf/postfixadmin.conf

# php-fpm
Include conf/extra/php-fpm.conf

# Secure (SSL/TLS) connections
Include conf/extra/httpd-ssl.conf

<IfModule ssl_module>
SSLRandomSeed startup builtin
SSLRandomSeed connect builtin
</IfModule>

<IfModule mod_ssl.c>
Listen 0.0.0.0:443
</IfModule>
Include /etc/httpd/conf/extra/httpd-vhosts-le-ssl.conf
php-fpm proxy configuration
/etc/httpd/conf/extra/php-fpm.conf
DirectoryIndex index.php index.html
<FilesMatch \.php$>
    SetHandler "proxy:unix:/run/php-fpm/php-fpm.sock|fcgi://localhost/"
</FilesMatch>
chmod 644 /etc/httpd/conf/extra/php-fpm.conf
/etc/httpd/conf/postfixadmin.conf
Alias /postfixadmin "/usr/share/webapps/postfixadmin/public"
<Directory "/usr/share/webapps/postfixadmin/public">
    DirectoryIndex index.html index.php
    <FilesMatch \.php$>
        SetHandler "proxy:unix:/run/postfixadmin/postfixadmin.sock|fcgi://localhost/"
    </FilesMatch>
    AllowOverride All
    Options FollowSymlinks
    Require all granted
    SetEnv PHP_ADMIN_VALUE "open_basedir = /tmp/:/usr/share/webapps/postfixadmin:/etc/webapps/postfixadmin/:/var/cache/postfixadmin/templates_c"
</Directory>
/etc/php/php-fpm.d/postfixadmin.conf
[postfixadmin]
user = postfixadmin
group = postfixadmin
listen = /run/postfixadmin/postfixadmin.sock
listen.owner = root
listen.group = http
listen.mode = 0660
pm = ondemand
pm.max_children = 4
php_admin_value['date.timezone'] = UTC
php_admin_value['session.save_path'] = /tmp
php_admin_value['open_basedir'] = /tmp/:/usr/share/webapps/postfixadmin/:/etc/webapps/postfixadmin/:/usr/bin/doveadm:/var/cache/postfixadmin
PHP configuration
open_basedir = /var/cache/postfixadmin/:/etc/webapps/:/usr/share/webapps/:/tmp/:/var/cache/roundcubemail:/usr/share/webapps/roundcubemail:/etc/webapps/roundcubemail:/usr/share/pear/:/var/log/roundcubemail
date.timezone = "UTC"

extension=imap
extension=mysqli
extension=pdo_mysql
extension=iconv
extension=gd
extension=intl
extension=exif
extension=imagick
PostfixAdmin configuration
/etc/webapps/postfixadmin/config.local.php
<?php
$CONF['configured'] = true;
// correspond to dovecot maildir path /home/vmail/%d/%u
$CONF['domain_path'] = 'YES';
$CONF['domain_in_mailbox'] = 'NO';
$CONF['database_type'] = 'mysqli';
$CONF['database_host'] = 'localhost';
$CONF['database_user'] = 'postfix_user';
$CONF['database_password'] = 'POSTFIXDBPASSWORD';
$CONF['database_name'] = 'postfix_db';

$CONF['default_aliases'] = array (
    'abuse' => 'abuse@wildw1ng.com',
    'hostmaster' => 'hostmaster@wildw1ng.com',
    'postmaster' => 'postmaster@wildw1ng.com',
    'webmaster' => 'webmaster@wildw1ng.com'
);

$CONF['vacation_domain'] = 'autoreply.wildw1ng.com';

$CONF['footer_text'] = 'Return to wildw1ng.com';
$CONF['footer_link'] = 'https://wildw1ng.com';
$CONF['encrypt'] = 'dovecot:SHA512-CRYPT';
$CONF['setup_password'] = 'HASHEDSETUPPASSWORD';
Enable and start Services.
Generate hashes with non-default hash functions.
doveadm pw -s SHA512-CRYPT -p "DOVEADMPASSWORD"
Write the HASHEDSETUPPASSWORD to the configuration file.
Navigate to http://10.0.1.18/postfixadmin/setup.php.
Now we can create a superadmin account.
Restrict access to setup.php after installation is finished.
chmod 600 /usr/share/webapps/postfixadmin/public/setup.php
Check the apache log for errors.
less /var/log/httpd/error_log
PostfixAdmin pacman hook
The database needs to be upgraded after a version bump.
We will see a message saying ‘The PostfixAdmin database layout is outdated’ on the login page.
Therefore we may set up a hook that runs the needed upgrade.php script automatically via a pacman hook.
/etc/pacman.d/hooks/postfixadmin.hook
[Trigger]
Operation = Install
Operation = Upgrade
Type = Package
Target = postfixadmin

[Action]
Description = Run Postfixadmin upgrade.php to make sure database is up to date
When = PostTransaction
Exec = /usr/bin/runuser -u postfixadmin -- /usr/bin/php /usr/share/webapps/postfixadmin/public/upgrade.php
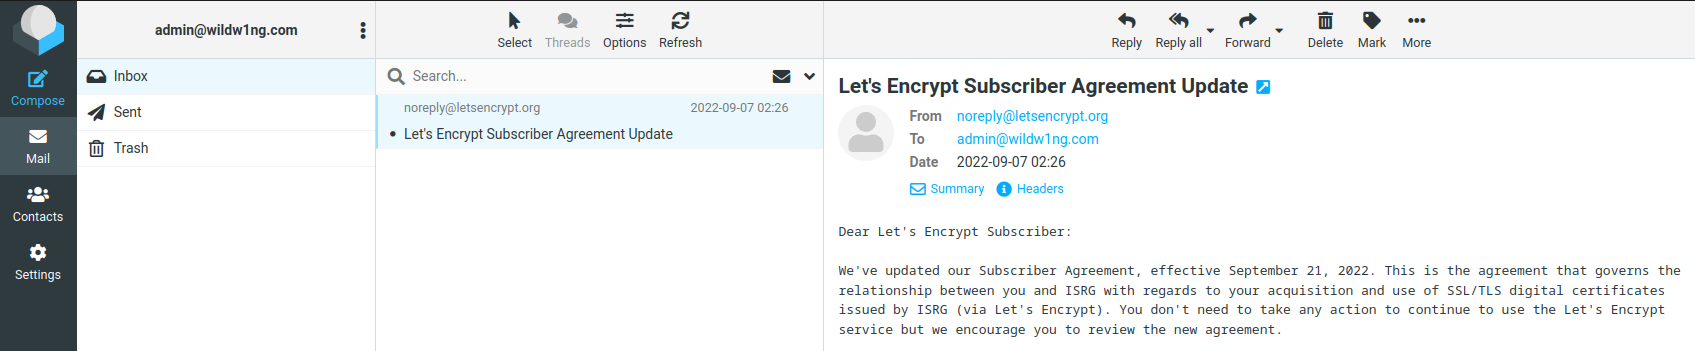
Roundcube
Full-featured, PHP web-based mail client.
Install Roundcube and PHP Plugin packages.
pacman -Syu roundcubemail php-gd php-intl php-imagick librsvg
Warning
Roundcube needs a separate database to work. You should not use the same database for Roundcube and PostfixAdmin.
Create a second database roundcube_db and a new user named roundcube_user.
Create an empty database and give the corresponding user permission to use the database.
CREATE DATABASE `roundcube_db` DEFAULT CHARACTER SET `utf8` COLLATE `utf8_unicode_ci`;
CREATE USER `roundcube_user`@'localhost' IDENTIFIED BY 'ROUNDCUBEDBPASSWORD';
GRANT ALL PRIVILEGES ON `roundcube_db`.* TO `roundcube_user`@`localhost`;
We need to initialize the roundcubemail database tables.
mysql -u root -p roundcube_db < /usr/share/webapps/roundcubemail/SQL/mysql.initial.sql
Copy the default configuration file and set permisions.
cd /etc/webapps/roundcubemail/config
cp config.inc.php.sample config.inc.php
chown http:http config.inc.php
Set our mail server settings.
/etc/webapps/roundcubemail/config/config.inc.php
?php

$config = [];

// Database connection string (DSN) for read+write operations
// Format (compatible with PEAR MDB2): db_provider://user:password@host/database
// Currently supported db_providers: mysql, pgsql, sqlite, mssql, sqlsrv, oracle
// For examples see http://pear.php.net/manual/en/package.database.mdb2.intro-dsn.php
// NOTE: for SQLite use absolute path (Linux): 'sqlite:////full/path/to/sqlite.db?mode=0646'
//       or (Windows): 'sqlite:///C:/full/path/to/sqlite.db'
$config['db_dsnw'] = 'mysql://roundcube_user:ROUNDCUBEDBPASSWORD@localhost/roundcube_db';
$config['imap_host'] = 'tls://mail.wildw1ng.com';
$config['smtp_host'] = 'tls://mail.wildw1ng.com';
$config['smtp_port'] = 587;
$config['imap_port'] = 993;
$config['mime_types'] = '/etc/webapps/roundcubemail/config/mime.types';

// IMAP host chosen to perform the log-in.
// See defaults.inc.php for the option description.
// $config['imap_host'] = 'localhost:143';

// SMTP server host (for sending mails).
// See defaults.inc.php for the option description.
// $config['smtp_host'] = 'localhost:587';

// SMTP username (if required) if you use %u as the username Roundcube
// will use the current username for login
$config['smtp_user'] = '%u';

// SMTP password (if required) if you use %p as the password Roundcube
// will use the current user's password for login
$config['smtp_pass'] = '%p';

// provide an URL where a user can get support for this Roundcube installation
// PLEASE DO NOT LINK TO THE ROUNDCUBE.NET WEBSITE HERE!
$config['support_url'] = 'https://wildw1ng.com';

// Name your service. This is displayed on the login screen and in the window title
$config['product_name'] = 'Roundcube Webmail';

// This key is used to encrypt the users imap password which is stored
// in the session record. For the default cipher method it must be
// exactly 24 characters long.
// YOUR KEY MUST BE DIFFERENT THAN THE SAMPLE VALUE FOR SECURITY REASONS
$config['des_key'] = 'LONGRANDOMSTRING';

// List of active plugins (in plugins/ directory)
$config['plugins'] = [
    'archive',
    'zipdownload',
    'password',
];

// skin name: folder from skins/
$config['skin'] = 'elastic';
Set enable_installer to enable the setup wizard
$config['enable_installer'] = true;
For Roundcube to be able to detect mime-types from filename extensions you need to point it to a mime.types file.
Apache usually comes with one.
cp /etc/httpd/conf/mime.types /etc/webapps/roundcubemail/config/mime.types
chown http:http /etc/webapps/roundcubemail/config/mime.types
chmod 640 /etc/webapps/roundcubemail/config/mime.types
/etc/webapps/roundcubemail/config/config.inc.php
$config['mime_types'] = '/etc/webapps/roundcubemail/config/mime.types';
Info
If you have configured open_basedir in php.ini, make sure it includes /etc/webapps and /usr/share/webapps,
so PHP can open the required Roundcube files.
Enable the password plugin to let users change their passwords from within Roundcube.
/etc/webapps/roundcubemail/config/config.inc.php
$config['plugins'] = password;
Configure the password plugin and make sure you alter the settings accordingly.
/usr/share/webapps/roundcubemail/plugins/password/config.inc.php
<?php

$config['password_driver'] = 'sql';
$config['password_db_dsn'] = 'mysql://postfix_user:POSTFIXDBPASSWORD@localhost/postfix_db';
// If you are not using dovecot specify another algorithm explicitly e.g 'sha256-crypt'
$config['password_algorithm'] = 'dovecot';
// For dovecot salted passwords only (above must be set to 'dovecot')
// $config['password_algorithm_prefix'] = 'true';
// $config['password_dovecotpw'] = 'doveadm pw';
// $config['password_dovecotpw_method'] = 'SHA512-CRYPT';
// $config['password_dovecotpw_with_method'] = true;
$config['password_query'] = 'UPDATE mailbox SET password=%P WHERE username=%u';
Now we finish the Roundcube installation with the wizard in our browser http://10.0.1.18/roundcube/installer.
For security reasons, we have to disable the installer after finishing the wizard and
remove the installer directory.
rm /usr/share/webapps/roundcubemail/installer
/etc/webapps/roundcubemail/config/config.inc.php
delete $config['enable_installer'] = true;
DNS Record
We need to set A and MX DNS records pointing our mail server.
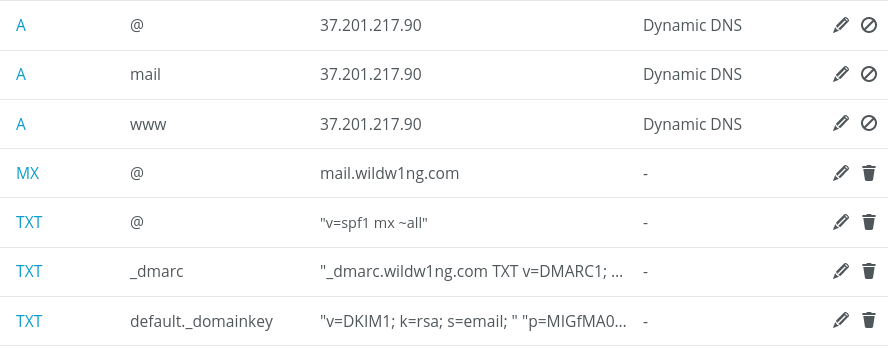
A record pointing our system’s FQDN (hostname) to our mail server IPv4 address.
mail.wildw1ng.com 60 IN A 37.201.217.90
MX record specifies which mail server is responsible for accepting emails on behalf of a recipient’s domain.
All messages sent to @wildw1ng.com email addresses will be accepted by the mail.wildw1ng.com mail server.
wildw1ng.com 3600 IN MX 0 mail.wildw1ng.com
Open ports on mail server
| Port |
Service |
Description |
| 25 |
SMTP |
Transmission of email from email server to email server |
| 993 |
IMAP |
Secure session |
Check open ports on our machine.
Get SSL certificates with Certbot via Let’s Encrypt for Apache
/etc/httpd/conf/extra/httpd-vhosts.conf
<VirtualHost *:80>
        ServerAdmin admin@wildw1ng.com
        DocumentRoot "/usr/share/webapps/roundcubemail"
        ServerName mail.wildw1ng.com
        ServerAlias mail.wildw1ng.com
        ErrorLog "/var/log/httpd/mail.wildw1ng.com-error.log"
        CustomLog "/var/log/httpd/mail.wildw1ng.com-access.log" common
        <Directory "/usr/share/webapps/roundcubemail">
                AllowOverride All
                Options FollowSymlinks
                Require all granted
                SetEnv PHP_ADMIN_VALUE "open_basedir /tmp/:/var/cache/roundcubemail:/usr/share/webapps/roundcubemail:/etc/webapps/roundcubemail:/usr/share/pear/:/var/log/roundcubemail"
        </Directory>
RewriteEngine on
RewriteCond %{SERVER_NAME} =mail.wildw1ng.com
RewriteRule ^ https://%{SERVER_NAME}%{REQUEST_URI} [END,NE,R=permanent]
</VirtualHost>
/etc/httpd/conf/extra/httpd-vhosts-le-ssl.conf
<IfModule mod_ssl.c>
SSLStaplingCache shmcb:/var/run/apache2/stapling_cache(128000)
<VirtualHost *:443>
        ServerAdmin admin@wildw1ng.com
        DocumentRoot "/usr/share/webapps/roundcubemail"
        ServerName mail.wildw1ng.com
        ServerAlias mail.wildw1ng.com
        ErrorLog "/var/log/httpd/mail.wildw1ng.com-error.log"
        CustomLog "/var/log/httpd/mail.wildw1ng.com-access.log" common
        <Directory "/usr/share/webapps/roundcubemail">
                AllowOverride All
                Options FollowSymlinks
                Require all granted
                SetEnv PHP_ADMIN_VALUE "open_basedir /tmp/:/var/cache/roundcubemail:/usr/share/webapps/roundcubemail:/etc/webapps/roundcubemail:/usr/share/pear/:/var/log/roundcubemail"
        </Directory>

Include /etc/letsencrypt/options-ssl-apache.conf
SSLCertificateFile /etc/letsencrypt/live/mail.wildw1ng.com/fullchain.pem
SSLCertificateKeyFile /etc/letsencrypt/live/mail.wildw1ng.com/privkey.pem
SSLUseStapling on
</VirtualHost>
</IfModule>
Run Certbot to obtain a certificate.
Certificate is saved at: /etc/letsencrypt/live/mail.wildw1ng.com/fullchain.pem
Key is saved at: /etc/letsencrypt/live/mail.wildw1ng.com/privkey.pem
If we get errors, we have to ensure that SSL is not multiple defined.
grep -r "Listen 443" /etc/httpd
Sender Policy Framework
SPF is an email authentication protocol used to stop phishing attacks.
We can specify who is allowed to send email on behalf of our domain.
Install SPF package.
yay -Syu python-spf-engine
Modify Postfix configuration files to enable SPF.
smtpd_recipient_restrictions = permit_mynetworks, permit_sasl_authenticated, reject_unauth_destination, check_policy_service unix:private/policy-spf
policy-spf_time_limit = 3600s
policy-spf  unix  -       n       n       -       0       spawn
    user=nobody argv=/usr/bin/policyd-spf
SPF DNS Record
To allow other mail exchangers to validate mails apparently sent from our domain,
we need to set a DNS TXT record with v=spf1 mx ~all.
We are approving the domain mail servers (mx) and if the SPF check fails, the result will be a soft failure (~all).
DomainKeys Identified Mail
DKIM is a sender authentication protocol that allows signing messages so mailbox providers can verify them.
This method is designed to detect email spoofing by identifying forged sender addresses in email.
Install OpenDKIM package.
Create a directory for dkim.
Generate a secret signing key.
opendkim-genkey -r -s default -d wildw1ng.com
chmod 400 /var/db/dkim/default.*
Copy the default configuration file.
cp /usr/share/doc/opendkim/opendkim.conf.sample /etc/opendkim/opendkim.conf
chmod 644 /etc/opendkim/opendkim.conf
Modify OpenDKIM configuration and create a Socket for DKIM.
/etc/opendkim/opendkim.conf
Domain                  wildw1ng.com
KeyFile                 /var/db/dkim/default.private
Selector                default
Socket                  unix:/run/opendkim/opendkim.sock
TemporaryDirectory      /run/opendkim
UMask                   002
UserID                  opendkim
Canonicalization        relaxed/simple
chown opendkim:postfix /run/opendkim
mkdir -p /etc/systemd/system/opendkim.service.d/
chmod 755 /etc/systemd/system/opendkim.service.d/
/etc/tmpfiles.d/opendkim.conf
D /run/opendkim 0750 opendkim postfix
chmod 644 /etc/tmpfiles.d/opendkim.conf
/etc/systemd/system/opendkim.service.d/override.conf
[Service]
User=
User=opendkim
Group=
Group=postfix
chmod 644 /etc/systemd/system/opendkim.service.d/override.conf
chown opendkim:postfix /var/db/dkim/
chown opendkim:postfix /var/db/dkim/default.private
Enable and start the opendkim.service.
systemctl enable opendkim
DKIM DNS Record
Add a DNS TXT record with the selector and public key.
less /var/db/dkim/default.txt
Copy everything in between (" “) without the brackets and quotes into a default._domainkey TXT DNS Record.
v=DKIM1; k=rsa; s=email; p=MIGfMA0GCSqGSIb3DQEBAQUAA4GNXDCBiQKBgQDjk96JyEAU2QLfDjZYyHTHVWYP/effPipH3hpgfa+Nk Wg/WmfZXjI3CmDY+N3m+eRmZdIzYO9oPGi+r0h3ceSZe4Cj858/k/0D7aYdG18QQDLIY+x+dmp7MjRK1+/B1xWjWy/Sn4n F1zVmROVxuBraX2eL32deu+qrnZlsu2H9MwIDAQAB
Check the record.
host -t TXT default._domainkey.wildw1ng.com
Domain-based Message Authentication, Reporting and Conformance
DMARC is an email authentication protocol that provides domain-level protection, detecting and preventing email spoofing techniques used in phishing.
Install OpenDMARC package.
Modify OpenDMARC configuration and create a Socket for DMARC.
/etc/opendmarc/opendmarc.conf
Socket  unix:/run/opendmarc/opendmarc.sock
UMask 002
chown opendmarc:postfix /run/opendmarc
/etc/tmpfiles.d/opendmarc.conf
D /run/opendmarc 0750 opendmarc postfix
chmod 644 /etc/tmpfiles.d/opendmarc.conf
mkdir -p /etc/systemd/system/opendmarc.service.d/
chmod 755 /etc/systemd/system/opendmarc.service.d/
/etc/systemd/system/opendmarc.service.d/override.conf
[Service]
Group=
Group=postfix
chmod 644 /etc/systemd/system/opendmarc.service.d/override.conf
Add Mail Filter Sockets to our Postfix configuration and make sure that the DMARC milter is declared after the DKIM milter.
non_smtpd_milters   = unix:/run/opendkim/opendkim.sock, unix:/run/opendmarc/opendmarc.sock
smtpd_milters       = unix:/run/opendkim/opendkim.sock, unix:/run/opendmarc/opendmarc.sock
Enable and start the opendmarc.service.
systemctl enable opendmarc
DMARC DNS Record
To enable DMARC for a domain, add a new TXT record to its DNS zone.
First testing, no harm as (sub)policy is “none”, but start to receive aggregated reports and failing reports (SPF and DKIM).
_dmarc.wildw1ng.com TXT v=DMARC1; rua=mailto:admin@wildw1ng.com; ruf=mailto:admin@wildw1ng.com; adkim=s; fo=1
After a certain time, after analyzing these reports enable the policy, for wildw1ng, for 10% of e-mail traffic.
_dmarc.wildw1ng.com TXT v=DMARC1; p=quarantine; rua=mailto:admin@wildw1ng.com; ruf=mailto:admin@wildw1ng.com; adkim=s; fo=1; pct=10
Then slowly raise the percentage and finalize with policy 100% enabled and only failing reports.
_dmarc.wildw1ng.com TXT v=DMARC1; p=quarantine; ruf=mailto:admin@wildw1ng.com; adkim=s; fo=1
Use DNS blacklists
# Block spam using DNS blacklists
smtpd_client_restrictions = permit_mynetworks, permit_sasl_authenticated, reject_rbl_client zen.spamhaus.org, reject_rbl_client bl.spamcop.net
Set header checks.
header_checks = regexp:/etc/postfix/list_unsub_header
Create a list_unsub_header file.
/etc/postfix/list_unsub_header
/Content-Transfer-Encoding:/i PREPEND List-Unsubscribe: mailto:admin@wildw1ng.com?subject=unsubscribe
chmod 644 /etc/postfix/list_unsub_header
Amavis and ClamAV
Amavis is an interface between the MTA and content checkers, ClamAV virus scanner and SpamAssassin.
Install packages.
pacman -Syu amavisd-new clamav p7zip unrar arj lrzip lz4 lzo rpmextract
Disable anti-spam, enable logging.
/etc/amavisd/amavisd.conf
@bypass_virus_checks_maps = (1);  # controls running of anti-virus code
@bypass_spam_checks_maps  = (1);  # controls running of anti-spam code
# $bypass_decode_parts = 1;         # controls running of decoders&dearchivers

$mydomain = 'wildw1ng.com';
$myhostname = 'mail.wildw1ng.com';

$log_level = 5;              # verbosity 0..5, -d
Enable ClamAV support and list the same clamd.sock as in /etc/clamav/clamd.conf.
# http://www.clamav.net/
['ClamAV-clamd',
   \&ask_daemon, ["CONTSCAN {}\n", "/run/clamav/clamd.ctl"],
   qr/\bOK$/m, qr/\bFOUND$/m,
   qr/^.*?: (?!Infected Archive)(.*) FOUND$/m ],
# # NOTE: run clamd under the same user as amavisd - or run it under its own
# #   uid such as clamav, add user clamav to the amavis group, and then add
# # NOTE: match socket name (LocalSocket) in clamav.conf to the socket name in
# #   this entry; when running chrooted one may prefer a socket under $MYHOME.
Add a comment to this line to enable anti-virus scan.
# @bypass_virus_check_maps = (1); # controls running of anti-virus code
After that, add clamav user to amavis group to avoid permission problems.
usermod -a -G amavis clamav
Updating ClamAV virus definition database
We need to run freshclam before starting the service for the first time
or you will run into trouble/errors which will prevent ClamAV from starting correctly.
Start and enable clamav-freshclam.service so that the virus definitions are kept up to date.
systemctl enable clamav-freshclam.service
Start and enable Amavis and ClamAV services.
systemctl enable clamav-daemon.service
systemctl enable amavisd.service
Integration with Postfix
#
# anti spam & anti virus section
#
amavisfeed      unix  -    -       n       -       2       smtp
 -o smtp_data_done_timeout=1200
 -o smtp_send_xforward_command=yes
 -o disable_dns_lookups=yes
 -o max_use=20
127.0.0.1:10025 inet n  -       y       -       -       smtpd
 -o content_filter=
 -o smtpd_delay_reject=no
 -o smtpd_client_restrictions=permit_mynetworks,reject
 -o smtpd_helo_restrictions=
 -o smtpd_sender_restrictions=
 -o smtpd_recipient_restrictions=permit_mynetworks,reject
 -o smtpd_data_restrictions=reject_unauth_pipelining
 -o smtpd_end_of_data_restrictions=
 -o smtpd_restrictions_classes=
 -o mynetworks=127.0.0.0/8
 -o smtpd_error_sleep_time=0
 -o smtpd_soft_error_limit=1001
 -o smtpd_hard_error_limit=1000
 -o smtpd_client_connection_count_limit=0
 -o smtpd_client_connection_rate_limit=0
 -o receive_override_options=no_header_body_checks,no_unknown_recipient_checks,no_milters
 -o local_header_rewrite_clients=
In this configuration we assume that postfix and Amavis are running on the same machine (i.e. 127.0.0.1).
If that is not the case edit /etc/amavisd/amavisd.conf and the prevous Postfix entry accordingly.
Postfix will listen to port 10025 so that Amavis can send back checked emails to that port.
We also have to add a configuration in our smtp or submission sections.
-o content_filter=amavisfeed:[127.0.0.1]:10024
Using this options implies that Postfix will send emails to Amavis on port 10024, so that these can be checked.
If mail passes the control then these are sent to port 10025.
We can now restart postfix.service and amavisd.service.
SpamAssasin
Install package.
Note
Spamassassin is integrated in Amavis so we do not have to start spamassassin.service.
To enable support for Spamassassin comment the following line.
# @bypass_spam_checks_maps = (1); # controls running of anti-spam code
Edit the SpamAssassin configuration.
$sa_tag_level_deflt  = 1.0;  # add spam info headers if at, or above that level
$sa_tag2_level_deflt = 1.0;  # add 'spam detected' headers at that level
$sa_kill_level_deflt = 5.0;  # triggers spam evasive actions (e.g. blocks mail)
$sa_dsn_cutoff_level = 8;   # spam level beyond which a DSN is not sent
# $sa_quarantine_cutoff_level = 25; # spam level beyond which quarantine is off
$penpals_threshold_high = $sa_kill_level_deflt;  # do not waste time on hi spam
$bounce_killer_score = 100;  # spam score points to add for joe-jobbed bounces
Before we restart the amavisd service we have to run sa-update.
mkdir /etc/mail/spamassassin/sa-update-keys
chown spamd:spamd /etc/mail/spamassassin/sa-update-keys
chmod 700 /etc/mail/spamassassin/sa-update-keys
cd /etc/mail/spamassassin
sudo -u spamd wget "http://spamassassin.apache.org/updates/GPG.KEY"
sudo -u spamd sa-update --import GPG.KEY
sudo -u spamd sa-update -D
Keep SpamAssassin up to date
Manual update.
sudo -u spamd sa-update --channel updates.spamassassin.org
Create service to automate the process.
/usr/lib/systemd/system/spamassassin-update.service
[Unit]
Description=SpamAssassin Update
After=network.target

[Service]
User=spamd
Group=spamd
Type=oneshot
# UMask=0022

ExecStart=/usr/bin/vendor_perl/sa-update --channel updates.spamassassin.org
SuccessExitStatus=1
ExecStart=/usr/bin/vendor_perl/sa-compile
# ExecStart=!/usr/bin/systemctl -q --no-block try-restart spamassassin.service

# uncomment the following ExecStart line to train SA's bayes filter
# and specify the path to the mailbox that contains spam email(s)
# ExecStart=/usr/bin/vendor_perl/sa-learn --spam <path_to_your_spam_mailbox>
/usr/lib/systemd/system/spamassassin-update.timer
[Unit]
Description=SpamAssassin Update Timer

[Timer]
OnCalendar=daily
Persistent=true

[Install]
WantedBy=timers.target
Start and enable spamassassin-update.timer.
systemctl enable spamassassin-update.timer
Check permissions in /var/lib/spamassassin/ if you get errors.
Guacamole
How to access remote desktops and command line interfaces from any browser with Guacamole remote desktop gateway

Installation
pacman -Syu adobe-source-code-pro-fonts pipewire pipewire-alsa pipewire-jack pipewire-pulse wireplumber pipewire-docs helvum freerdp libwebsockets mariadb tomcat9 tomcat-native && yay -Syu guacamole-server guacamole-client
Manual guacamole client installation
wget https://apache.org/dyn/closer.lua/guacamole/1.4.0/binary/guacamole-1.4.0.war?action=download
mv guacamole-1.4.0.war /usr/share/guacamole/guacamole.war
Apache Tomcat Servlet
ln -s /usr/share/guacamole/guacamole.war /var/lib/tomcat9/webapps
/etc/tomcat9/tomcat-users.xml
<tomcat-users>
  <role rolename="tomcat"/>
  <role rolename="manager-gui"/>
  <role rolename="manager-script"/>
  <role rolename="manager-jmx"/>
  <role rolename="manager-status"/>
  <role rolename="admin-gui"/>
  <role rolename="admin-script"/>
  <user username="tomcat" password="PASSWORD1" roles="tomcat"/>
  <user username="manager" password="PASSWORD2" roles="manager-gui,manager-script,manager-jmx,manager-status"/>
  <user username="admin" password="PASSWORD3" roles="admin-gui"/>
</tomcat-users>
Database authentication
Installing MariaDB/MySQL system tables.
mariadb-install-db --user=mysql --basedir=/usr --datadir=/var/lib/mysql
Improve initial security with recommended security measures,
such as removing anonymous accounts and removing the test database.
mysql_secure_installation
When prompted to “Switch to unix_socket authentication” enter n for No.
Listen only on the loopback address
[mysqld]
bind-address = localhost
systemctl restart mariadb
Create Guacamole database
CREATE DATABASE guacamole_db;
CREATE USER 'guacamole_user'@'localhost' IDENTIFIED BY 'PASSWORD';
GRANT SELECT,INSERT,UPDATE,DELETE ON guacamole_db.* TO 'guacamole_user'@'localhost';
FLUSH PRIVILEGES;
quit;
Install MySQL extensions for Guacamole
mkdir /etc/guacamole/{extensions,lib}
chmod 755 /etc/guacamole/extensions
chmod 755 /etc/guacamole/lib
echo 'GUACAMOLE_HOME=/etc/guacamole' >> /etc/default/tomcat9
Download the MySQL extension
https://guacamole.apache.org/releases/
cd /etc/guacamole/extensions/
wget https://dlcdn.apache.org/guacamole/1.4.0/binary/guacamole-auth-jdbc-1.4.0.tar.gz
tar -vxf guacamole-auth-jdbc-1.4.0.tar.gz
Write SQL schema files into the MySQL database
cat /etc/guacamole/extensions/guacamole-auth-jdbc-1.4.0/mysql/schema/*.sql | mysql guacamole_db
Copy the extension
cp /etc/guacamole/extensions/guacamole-auth-jdbc-1.4.0/mysql/guacamole-auth-jdbc-mysql-1.4.0.jar /etc/guacamole/extensions/
chmod 644 /etc/guacamole/extensions/guacamole-auth-jdbc-mysql-1.4.0.jar
Download the JDBC driver
https://dev.mysql.com/downloads/connector/j/
wget https://dev.mysql.com/get/Downloads/Connector-J/mysql-connector-java-8.0.29.tar.gz
tar -vxf mysql-connector-java-8.0.29.tar.gz
cp mysql-connector-java-8.0.29/mysql-connector-java-8.0.29.jar /etc/guacamole/lib/
chmod 644 /etc/guacamole/lib/mysql-connector-java-8.0.29.jar
Configuring the client to use the database
/etc/guacamole/guacamole.properties
# Hostname and Guacamole server port
guacd-hostname: localhost
guacd-port: 4822

# MySQL properties
mysql-hostname: localhost
mysql-port: 3306
mysql-database: guacamole_db
mysql-username: guacamole_user
mysql-password: PASSWORD
chmod 644 /etc/guacamole/guacamole.properties
chmod 644 /etc/guacamole/guacd.conf
Logging in
http://localhost:8080/guacamole
The default Guacamole user created by the provided SQL scripts is guacadmin, with a default password of guacadmin.
Warning
Before continuing with configuring Guacamole, it’s recommended that you create a new admin account and delete the original.
Create a new SSH connection using public key authentication
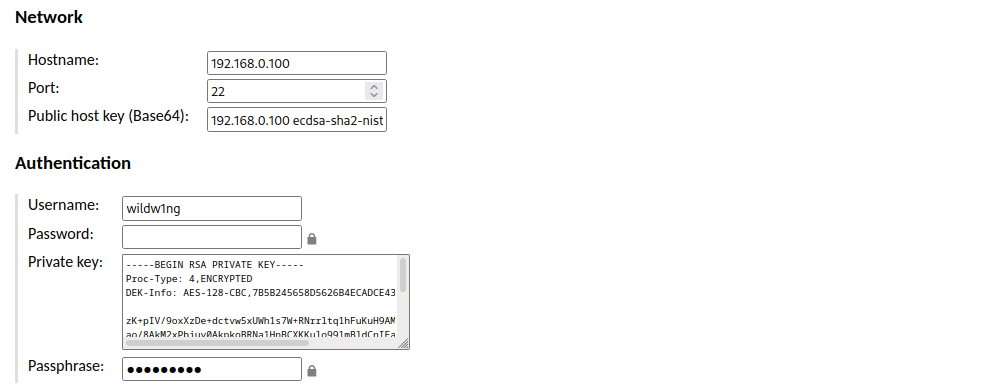
Generate key pair in PEM format on Guacamole machine
ssh-keygen -t rsa -b 4096 -m PEM
Find out Public host key (Base64) on the machine you want to connect to
ssh-keyscan -t ecdsa 192.168.0.204 2>&1 | grep ecdsa
Setup SSH server on the machine you want to connect to
AuthenticationMethods publickey
PubkeyAuthentication yes
PubkeyAcceptedKeyTypes=+ssh-rsa
PasswordAuthentication no
Fix RDP connection issues
Note
Guacamole server (guacd) service runs as user daemon by default.
ps aux | grep -v grep | grep guacd
Create a guacd system user account which can be used to run guacd instead of running as daemon user.
useradd -M -d /var/lib/guacd/ -r -s /sbin/nologin -c "Guacd" guacd
chown -R guacd: /var/lib/guacd
Change the Guacd service user
/usr/lib/systemd/system/guacd.service
[Unit]
Description=Guacamole Server
Documentation=man:guacd(8)
After=network.target

[Service]
User=guacd
ExecStart=/usr/bin/guacd -f
Restart=on-abnormal

[Install]
WantedBy=multi-user.target
Write protect Guacamole service
chattr +i /usr/lib/systemd/system/guacd.service
Zabbix
How to self host Zabbix, an Enterprise-class open source network monitoring solution

Install packages
pacman -Syu zabbix-server zabbix-frontend-php mariadb apache php php-fpm php-apache php-gd fping traceroute
Install MariaDB/MySQL system tables
mariadb-install-db --user=mysql --basedir=/usr --datadir=/var/lib/mysql
Improve initial security with recommended security measures,
such as removing anonymous accounts and removing the test database.
mysql_secure_installation
When prompted to “Switch to unix_socket authentication” enter n for No.
Listen only on the loopback address
[mysqld]
bind-address = localhost
systemctl restart mariadb
Database Initialization
mysql -v -u root -p -e "create database zabbix character set utf8 collate utf8_bin"
mysql -v -u root -p -e "grant all on zabbix.* to zabbix@localhost identified by 'MYPASSWORD'"
mysql -v -u zabbix -p -D zabbix < /usr/share/zabbix-server/mysql/schema.sql
mysql -v -u zabbix -p -D zabbix < /usr/share/zabbix-server/mysql/images.sql
mysql -v -u zabbix -p -D zabbix < /usr/share/zabbix-server/mysql/data.sql
Database Configuration
/etc/zabbix/zabbix_server.conf
DBName=zabbix
DBUser=zabbix
DBPassword=MYPASSWORD
LogType=system
Setup Apache HTTP Server
Enable proxy modules
/etc/httpd/conf/httpd.conf
uncomment LoadModule proxy_module modules/mod_proxy.so
uncomment LoadModule proxy_fcgi_module modules/mod_proxy_fcgi.so
comment # LoadModule mpm_event_module modules/mod_mpm_event.so
uncomment LoadModule mpm_prefork_module modules/mod_mpm_prefork.so
At the end of the LoadModule list
add LoadModule php_module modules/libphp.so
add AddHandler php-script .php
At the end of the Include list
add Include conf/extra/php_module.conf
add Include conf/extra/php-fpm.conf
/etc/httpd/conf/extra/php-fpm.conf
DirectoryIndex index.php index.html
<FilesMatch \.php$>
    SetHandler "proxy:unix:/run/php-fpm/php-fpm.sock|fcgi://localhost/"
</FilesMatch>
Symlink the Zabbix web application directory to your http document root
ln -s /usr/share/webapps/zabbix /srv/http/zabbix
Setup PHP
List available php modules
date.timezone = Europe/Berlin
display_errors = On
open_basedir = /srv/http/:/var/www/:/home/:/tmp/:/var/tmp/:/var/cache/:/usr/share/pear/:/usr/share/webapps/:/etc/webapps/

post_max_size = 16M
max_execution_time = 300
max_input_time = 300

extension=bcmath
extension=curl
extension=gd
extension=gettext
extension=mysqli
extension=sockets
extension=zip
Enable and start services
systemctl enable zabbix-server-mysql
Access Zabbix via your local web server, http://localhost/zabbix/,
finish the installation wizard and access the frontend the first time.
The default username is Admin and password zabbix.
Fix “[ERROR] Incorrect definition of table mysql.column_stats: expected column ‘histogram’”
mysql_upgrade --user=root
Setup client machines
Install client
pacman -Syu zabbix-agent2
Configuration
/etc/zabbix/zabbix_agent2.conf
Replace the server variable with the IP of your monitoring server.
Only servers from this/these IP will be allowed to access the agent.
ServerActive=archlinux-zabbix
Make sure the port 10050 on your device being monitored is not blocked and is properly forwarded.
comment out # Include=./zabbix_agent2.d/plugins.d/*.conf
Monitor Arch Linux clients for available system updates using a custom UserParameter
# Monitor Arch Linux system updates
Include=/etc/zabbix/zabbix_agent2.conf.d/*.conf
mkdir /etc/zabbix/zabbix_agent2.conf.d
/etc/zabbix/zabbix_agent2.conf.d/archlinuxupdates.conf
UserParameter=archlinuxupdates,checkupdates | wc -l
chown -R zabbix-agent:zabbix-agent /etc/zabbix/zabbix_agent2.conf.d
chmod 755 /etc/zabbix/zabbix_agent2.conf.d
chmod 644 /etc/zabbix/zabbix_agent2.conf.d/archlinuxupdates.conf
Monitor nVidia GPU
/etc/zabbix/zabbix_agent2.conf.d/nvidiagpu.conf
UserParameter=gpu.temp,nvidia-smi --query-gpu=temperature.gpu --format=csv,noheader,nounits -i 0
UserParameter=gpu.memtotal,nvidia-smi --query-gpu=memory.total --format=csv,noheader,nounits -i 0
UserParameter=gpu.used,nvidia-smi --query-gpu=memory.used --format=csv,noheader,nounits -i 0
UserParameter=gpu.free,nvidia-smi --query-gpu=memory.free --format=csv,noheader,nounits -i 0
UserParameter=gpu.fanspeed,nvidia-smi --query-gpu=fan.speed --format=csv,noheader,nounits -i 0
UserParameter=gpu.utilisation,nvidia-smi --query-gpu=utilization.gpu --format=csv,noheader,nounits -i 0
UserParameter=gpu.power,nvidia-smi --query-gpu=power.draw --format=csv,noheader,nounits -i 0
UserParameter=cpu.temp,sensors | grep "CPU Temperature" | awk '{print $ 3}' | cut -c 2-5
chown -R zabbix-agent:zabbix-agent /etc/zabbix/zabbix_agent2.conf.d
Enable and start the zabbix-agent service
systemctl enable zabbix-agent2
systemctl start zabbix-agent2
systemctl status zabbix-agent2
Fail2ban
How to protect your server from Brute-force attacks and prevent intrusions with Fail2ban

Installation
pacman -Syu firewalld fail2ban ipset
Enable and start services
systemctl enable firewalld
systemctl start firewalld
systemctl enable fail2ban
Firewalld configuration
Set the default zone
firewall-cmd --set-default-zone=public
Add an interface to a zone
firewall-cmd --permanent --zone=public --add-interface=enp1s0
Get active zones
firewall-cmd --get-active-zones
Get a list of all supported services
firewall-cmd --get-services
Enable firewalld services in a zone
firewall-cmd --permanent --zone=public --add-service=ssh
firewall-cmd --permanent --zone=public --add-service=http
firewall-cmd --permanent --zone=public --add-service=https
firewall-cmd --permanent --zone=public --add-service=zabbix-agent
firewall-cmd --permanent --zone=public --add-service=smtp
Fail2ban configuration
Copy default fail2ban configuration from “jail.conf” to “jail.local”
cp /etc/fail2ban/jail.conf /etc/fail2ban/jail.local
Set default values
[DEFAULT]
ignoreip = 127.0.0.1/8 10.0.0.0/22

bantime  = 1w
findtime  = 1d
maxretry = 3

backend = auto

action = %(action_)s
[recidive]

enabled = true
logpath  = /var/log/fail2ban.log
banaction = %(banaction_allports)s
bantime = -1        ; permanent
findtime = 1d
maxretry = 6
Setup jails
/etc/fail2ban/jail.d/nginx.local
[nginx-noscript]
enabled = true
port = http,https
filter = nginx-noscript
logpath = /var/log/nginx/*access.log
maxretry = 1
bantime  = 86400

[nginx-badbots]
enabled = true
port = http,https
filter = nginx-badbots
logpath = /var/log/nginx/*access.log
bantime = 86400
maxretry = 1

[nginx-nohome]
enabled = true
port = http,https
filter = nginx-nohome
logpath = /var/log/nginx/*access.log
bantime = 600
maxretry = 2

[nginx-noproxy]
enabled = true
port = http,https
filter = nginx-noproxy
logpath  = /var/log/nginx/*access.log
maxretry = 2
bantime  = 86400

[nginx-http-auth]
enabled = true
port = http,https
filter = nginx-http-auth
logpath = /var/log/nginx/*error.log
bantime = 600
maxretry = 6

[nginx-login]
enabled = true
port = http,https
filter = nginx-login
logpath  = /var/log/nginx/*access.log
bantime = 600
maxretry = 6

[nginx-limit-req]
enabled = true
filter = nginx-limit-req
port = http,https
logpath = /var/log/nginx/*error.log
bantime = 7200
maxretry = 10
Filter definitions
/etc/fail2ban/filter.d/nginx-badbots.conf
# Fail2Ban configuration file
#
# Regexp to catch known spambots and software alike. Please verify
# that it is your intent to block IPs which were driven by
# above mentioned bots.


[Definition]

badbotscustom = EmailCollector|WebEMailExtrac|TrackBack/1\.02|sogou music spider|(?:Mozilla/\d+\.\d+ )?Jorgee
badbots = Atomic_Email_Hunter/4\.0|atSpider/1\.0|autoemailspider|bwh3_user_agent|China Local Browse 2\.6|ContactBot/0\.2|ContentSmartz|DataCha0s/2\.0|DBrowse 1\.4b|DBrowse 1\.4d|Demo Bot DOT 16b|Demo Bot Z 16b|DSurf15a 01|DSurf15a 71|DSurf15a 81|DSurf15a VA|EBrowse 1\.4b|Educate Search VxB|EmailSiphon|EmailSpider|EmailWolf 1\.00|ESurf15a 15|ExtractorPro|Franklin Locator 1\.8|FSurf15a 01|Full Web Bot 0416B|Full Web Bot 0516B|Full Web Bot 2816B|Guestbook Auto Submitter|Industry Program 1\.0\.x|ISC Systems iRc Search 2\.1|IUPUI Research Bot v 1\.9a|LARBIN-EXPERIMENTAL \(efp@gmx\.net\)|LetsCrawl\.com/1\.0 \+http\://letscrawl\.com/|Lincoln State Web Browser|LMQueueBot/0\.2|LWP\:\:Simple/5\.803|Mac Finder 1\.0\.xx|MFC Foundation Class Library 4\.0|Microsoft URL Control - 6\.00\.8xxx|Missauga Locate 1\.0\.0|Missigua Locator 1\.9|Missouri College Browse|Mizzu Labs 2\.2|Mo College 1\.9|MVAClient|Mozilla/2\.0 \(compatible; NEWT ActiveX; Win32\)|Mozilla/3\.0 \(compatible; Indy Library\)|Mozilla/3\.0 \(compatible; scan4mail \(advanced version\) http\://www\.peterspages\.net/?scan4mail\)|Mozilla/4\.0 \(compatible; Advanced Email Extractor v2\.xx\)|Mozilla/4\.0 \(compatible; Iplexx Spider/1\.0 http\://www\.iplexx\.at\)|Mozilla/4\.0 \(compatible; MSIE 5\.0; Windows NT; DigExt; DTS Agent|Mozilla/4\.0 efp@gmx\.net|Mozilla/5\.0 \(Version\: xxxx Type\:xx\)|NameOfAgent \(CMS Spider\)|NASA Search 1\.0|Nsauditor/1\.x|PBrowse 1\.4b|PEval 1\.4b|Poirot|Port Huron Labs|Production Bot 0116B|Production Bot 2016B|Production Bot DOT 3016B|Program Shareware 1\.0\.2|PSurf15a 11|PSurf15a 51|PSurf15a VA|psycheclone|RSurf15a 41|RSurf15a 51|RSurf15a 81|searchbot admin@google\.com|ShablastBot 1\.0|snap\.com beta crawler v0|Snapbot/1\.0|Snapbot/1\.0 \(Snap Shots, \+http\://www\.snap\.com\)|sogou develop spider|Sogou Orion spider/3\.0\(\+http\://www\.sogou\.com/docs/help/webmasters\.htm#07\)|sogou spider|Sogou web spider/3\.0\(\+http\://www\.sogou\.com/docs/help/webmasters\.htm#07\)|sohu agent|SSurf15a 11 |TSurf15a 11|Under the Rainbow 2\.2|User-Agent\: Mozilla/4\.0 \(compatible; MSIE 6\.0; Windows NT 5\.1\)|VadixBot|WebVulnCrawl\.unknown/1\.0 libwww-perl/5\.803|Wells Search II|WEP Search 00

failregex = ^<HOST> -.*"(GET|POST|HEAD).*HTTP.*"(?:%(badbots)s|%(badbotscustom)s)"$

ignoreregex =

datepattern = ^[^\[]*\[({DATE})
              {^LN-BEG}

# DEV Notes:
# List of bad bots fetched from http://www.user-agents.org
# Generated on Thu Nov  7 14:23:35 PST 2013 by files/gen_badbots.
#
# Author: Yaroslav Halchenko
/etc/fail2ban/filter.d/nginx-http-auth.conf
# fail2ban filter configuration for nginx


[Definition]


failregex = ^ \[error\] \d+#\d+: \*\d+ user "(?:[^"]+|.*?)":? (?:password mismatch|was not found in "[^\"]*"), client: <HOST>, server: \S*, request: "\S+ \S+ HTTP/\d+\.\d+", host: "\S+"(?:, referrer: "\S+")?\s*$
            ^ \[error\] \d+#\d+: \*\d+ no user/password was provided for basic authentication, client: <HOST>, server: \S+, request: "\S+ \S+ HTTP/\d+\.\d+", host: "\S+"\s*$
ignoreregex =

datepattern = {^LN-BEG}

# DEV NOTES:
# Based on samples in https://github.com/fail2ban/fail2ban/pull/43/files
# Extensive search of all nginx auth failures not done yet.
#
# Author: Daniel Black
/etc/fail2ban/filter.d/nginx-limit-req.conf
# Fail2ban filter configuration for nginx :: limit_req
# used to ban hosts, that were failed through nginx by limit request processing rate
#
# Author: Serg G. Brester (sebres)
#
# To use 'nginx-limit-req' filter you should have `ngx_http_limit_req_module`
# and define `limit_req` and `limit_req_zone` as described in nginx documentation
# http://nginx.org/en/docs/http/ngx_http_limit_req_module.html
#
# Example:
#
#   http {
#     ...
#     limit_req_zone $binary_remote_addr zone=lr_zone:10m rate=1r/s;
#     ...
#     # http, server, or location:
#     location ... {
#       limit_req zone=lr_zone burst=1 nodelay;
#       ...
#     }
#     ...
#   }
#   ...
#

[Definition]

# Specify following expression to define exact zones, if you want to ban IPs limited
# from specified zones only.
# Example:
#
#   ngx_limit_req_zones = lr_zone|lr_zone2
#
ngx_limit_req_zones = [^"]+

# Use following full expression if you should range limit request to specified
# servers, requests, referrers etc. only :
#
# failregex = ^\s*\[[a-z]+\] \d+#\d+: \*\d+ limiting requests, excess: [\d\.]+ by zone "(?:%(ngx_limit_req_zones)s)", client: <HOST>, server: \S*, request: "\S+ \S+ HTTP/\d+\.\d+", host: "\S+"(, referrer: "\S+")?\s*$

# Shortly, much faster and stable version of regexp:
failregex = ^\s*\[[a-z]+\] \d+#\d+: \*\d+ limiting requests, excess: [\d\.]+ by zone "(?:%(ngx_limit_req_zones)s)", client: <HOST>,

ignoreregex =

datepattern = {^LN-BEG}
/etc/fail2ban/filter.d/nginx-login.conf
# Login filter /etc/fail2ban/filter.d/nginx-login.conf: Blocks IPs that fail to
# authenticate using web application's log in page
#
# Scan access log for HTTP 200 + POST /sessions => failed log in
[Definition]
failregex = ^<HOST> -.*POST /sessions HTTP/1\.." 200
ignoreregex =
/etc/fail2ban/filter.d/nginx-nohome.conf
[Definition]

failregex = ^<HOST> -.*GET .*/~.*

maxlines = 1
[^\]]*)?\] (?:for user (?:"[^"]*" )?)?failed\.\s*$
datepattern = ^%%H:%%M:%%S\.%%f

ignoreregex =
/etc/fail2ban/filter.d/nginx-noproxy.conf
[Definition]
failregex = ^<HOST> -.*GET http.*
ignoreregex =
/etc/fail2ban/filter.d/nginx-noscript.conf
# Noscript filter /etc/fail2ban/filter.d/nginx-noscript.conf:
# Block IPs trying to execute scripts such as .php, .pl, .exe and other funny scripts.
# Matches e.g.
# 192.168.1.1 - - "GET /something.php
[Definition]

failregex = ^<HOST> -.*"GET .*(\.php|\.asp|\.exe|\.pl|\.cgi|\.scgi)[ /\?].*" .*$

ignoreregex = ^<HOST> -.*GET.*(/zabbix.php|/jsLoader.php|https://app.plex.tv/)
Set permissions
chmod 644 /etc/fail2ban/filter.d/nginx-*
systemctl restart fail2ban
firewall-cmd --list-rich-rules
fail2ban-client get nginx-badbots actions
fail2ban-client unban IPADRESS
/etc/fail2ban/jail.d/00-firewalld.local
[DEFAULT]
banaction = firewallcmd-ipset
Service hardening
Currently, Fail2ban must be run as root. Therefore, you may wish to consider hardening the process with systemd.
/etc/systemd/system/fail2ban.service.d/override.conf
[Service]
PrivateDevices=yes
PrivateTmp=yes
ProtectHome=read-only
ProtectSystem=strict
ReadWritePaths=-/var/run/fail2ban
ReadWritePaths=-/var/lib/fail2ban
ReadWritePaths=-/var/log/fail2ban
ReadWritePaths=-/var/spool/postfix/maildrop
ReadWritePaths=-/run/xtables.lock
CapabilityBoundingSet=CAP_AUDIT_READ CAP_DAC_READ_SEARCH CAP_NET_ADMIN CAP_NET_RAW
The CapabilityBoundingSet parameters CAP_DAC_READ_SEARCH will allow Fail2ban full read access to every directory and file.
CAP_NET_ADMIN and CAP_NET_RAW allow Fail2ban to operate on any firewall that has command-line shell interface.
By using ProtectSystem=strict the filesystem hierarchy will only be read-only,
ReadWritePaths allows Fail2ban to have write access on required paths.
Create /etc/fail2ban/fail2ban.local with the correct logtarget path
/etc/fail2ban/fail2ban.local
[Definition]
logtarget = /var/log/fail2ban/fail2ban.log
Create the /var/log/fail2ban/ directory as root.
reload systemd daemon to apply the changes of the unit and restart fail2ban.service
Debug filter
fail2ban-regex /var/log/nginx/error.log /etc/fail2ban/filter.d/nginx-http-auth.conf
fail2ban-regex /var/log/nginx/error.log /etc/fail2ban/filter.d/nginx-limit-req.conf
fail2ban-regex /var/log/nginx/access.log /etc/fail2ban/filter.d/nginx-noscript.conf
fail2ban-regex /var/log/nginx/access.log /etc/fail2ban/filter.d/nginx-badbots.conf
fail2ban-regex /var/log/nginx/access.log /etc/fail2ban/filter.d/nginx-nohome.conf
fail2ban-regex /var/log/nginx/access.log /etc/fail2ban/filter.d/nginx-noproxy.conf
fail2ban-regex /var/log/nginx/access.log /etc/fail2ban/filter.d/nginx-login.conf
Check status
cat /var/log/fail2ban/fail2ban.log
tail -f /var/log/fail2ban/fail2ban.log
Manually ban IP
fail2ban-client -vvv set recidive banip 83.97.73.87
fail2ban-client status recidive
Manually unban IP
fail2ban-client unban 192.168.0.100
Samba active directory
How to setup an active directory domain controller in Linux using Samba

Install packages
pacman -Syu krb5 python-dnspython openresolv samba bind
Rename machine
Note
Windows NetBIOS names are limited to 15 characters (16-bytes)
Setup network
Wired NAT adapter using a static IP
/etc/systemd/network/20-wired.network
[Match]
Name=enp1*

[Network]
Address=192.168.122.30/24
Gateway=192.168.122.1
DNS=127.0.0.1
chmod 644 /etc/systemd/network/20-wired.network
Tip
Second bridged wired adapter using DHCP for ssh access
/etc/systemd/network/21-wired.network
[Match]
Name=enp8*

[Network]
DHCP=yes
chmod 644 /etc/systemd/network/21-wired.network
Use local DNS server
Reconfigure resolvconf to use only localhost for DNS lookups.
# Samba configuration
search wildw1ng.local
nameserver 127.0.0.1
Set permissions
chmod 644 /etc/resolv.conf.tail
Regenerate the new file
read more…
System clock synchronization
read about systemd-timesyncd
Provisioning
 Performing basic directory configuration.
samba-tool domain provision --use-rfc2307 --interactive
–use-rfc2307
this argument adds POSIX attributes (UID/GID) to the AD Schema.
This will be necessary if you intend to authenticate Linux, BSD, or macOS clients (including the local machine) in addition to Microsoft Windows.
–interactive
this parameter forces the provision script to run interactively.
BIND configuration
// vim:set ts=4 sw=4 et:
acl local-networks {
    127.0.0.0/8;
    192.168.122.0/24;
};

options {
    directory "/var/named";
    pid-file "/run/named/named.pid";
    session-keyfile "/run/named/session.key";

    // Uncomment this line to enable IPv6 connections support
    //  listen-on-v6 { any; };
    // Add this for no IPv4:
    //  listen-on { none; };

    // Add any subnets or hosts you want to allow to the local-networks acl
    allow-query       { local-networks; };
    allow-recursion   { local-networks; };
    allow-query-cache { local-networks; };
    allow-transfer    { none; };
    allow-update      { none; };

    version none;
    hostname none;
    server-id none;

    auth-nxdomain yes;
    datasize default;
    empty-zones-enable no;
    tkey-gssapi-keytab "/var/lib/samba/private/dns.keytab";

    // Uncomment if you wish to use ISP forwarders
    // Google (8.8.8.8, 8.8.4.4, 2001:4860:4860::8888, and 2001:4860:4860::8844)
    // OpenDNS (208.67.222.222, 208.67.220.220, 2620:0:ccc::2 and 2620:0:ccd::2)
    // Appropriate values for subnets are specific to your network.
    // forwarders { 8.8.8.8; 8.8.8.4; };

};

zone "localhost" IN {
    type master;
    file "localhost.zone";
};

zone "0.0.127.in-addr.arpa" IN {
    type master;
    file "127.0.0.zone";
};

zone "1.0.0.0.0.0.0.0.0.0.0.0.0.0.0.0.0.0.0.0.0.0.0.0.0.0.0.0.0.0.0.0.ip6.arpa" {
    type master;
    file "localhost.ip6.zone";
};

// Load AD integrated zones
dlz "AD DNS Zones" {
    database "dlopen /usr/lib/samba/bind9/dlz_bind9_12.so";
};

//zone "example.org" IN {
//    type slave;
//    file "example.zone";
//    masters {
//        192.168.1.100;
//    };
//    allow-query { any; };
//    allow-transfer { any; };
//};

logging {
    channel xfer-log {
        file "/var/log/named.log";
            print-category yes;
            print-severity yes;
            severity info;
        };
        category xfer-in { xfer-log; };
        category xfer-out { xfer-log; };
        category notify { xfer-log; };
};
chmod 644 /etc/named.conf
chgrp named /var/lib/samba/private/dns.keytab
chmod g+r /var/lib/samba/private/dns.keytab
chown root:named /var/log/named.log
chmod 664 /var/log/named.log
Kerberos
Provisioning created a krb5.conf file for use with a Samba domain controller.
mv /etc/krb5.conf{,.default}
cp /var/lib/samba/private/krb5.conf /etc
[libdefaults]
        default_realm = WILDW1NG.LOCAL
        dns_lookup_realm = false
        dns_lookup_kdc = true

[realms]
WILDW1NG.LOCAL = {
        default_domain = WILDW1NG.LOCAL
}

[domain_realm]
        arch-vm-addc = WILDW1NG.LOCAL
Samba
Enable printing and automatic sharing of all CUPS print queues
[global]
        rpc_server:spoolss = external
        rpc_daemon:spoolssd = fork
        printing = CUPS

[printers]
       path = /var/spool/samba/
       printable = yes
Share only specific print queues
[global]
        load printers = no

# Add and example print share
[HPDJ3050]
       path = /var/spool/samba/
       printable = yes
       printer name = hpdj3050
Roaming profiles
Create samba share
[profiles]
    comment = User Profiles
    path = /profiles
    browseable = no
    read only = no
    csc policy = disable
    vfs objects = acl_xattr
# Global parameters
[global]
        netbios name = ARCH-VM-ADDC
        realm = WILDW1NG.LOCAL
        server role = active directory domain controller
        server services = s3fs, rpc, nbt, wrepl, ldap, cldap, kdc, drepl, winbindd, ntp_signd, kcc, dnsupdate
        workgroup = WILDW1NG
        idmap_ldb:use rfc2307 = yes
        tls enabled = yes
        tls keyfile = tls/key.pem
        tls certfile = tls/cert.pem
        tls cafile = tls/ca.pem
        # rpc_server:spoolss = external
        # rpc_daemon:spoolssd = fork
        # printing = CUPS
[sysvol]
        path = /var/lib/samba/sysvol
        read only = No

[netlogon]
        path = /var/lib/samba/sysvol/wildw1ng.local/scripts
        read only = No

# [printers]
        # path = /var/spool/samba
        # printable = yes

[profiles]
        comment = User Profiles
        path = /profiles
        browseable = no
        read only = no
        csc policy = disable
        vfs objects = acl_xattr
chmod 644 /etc/samba/smb.conf
LDB utilities
/etc/profile.d/sambaldb.sh
export LDB_MODULES_PATH="${LDB_MODULES_PATH}:/usr/lib/samba/ldb"
chmod 0755 /etc/profile.d/sambaldb.sh
. /etc/profile.d/sambaldb.sh
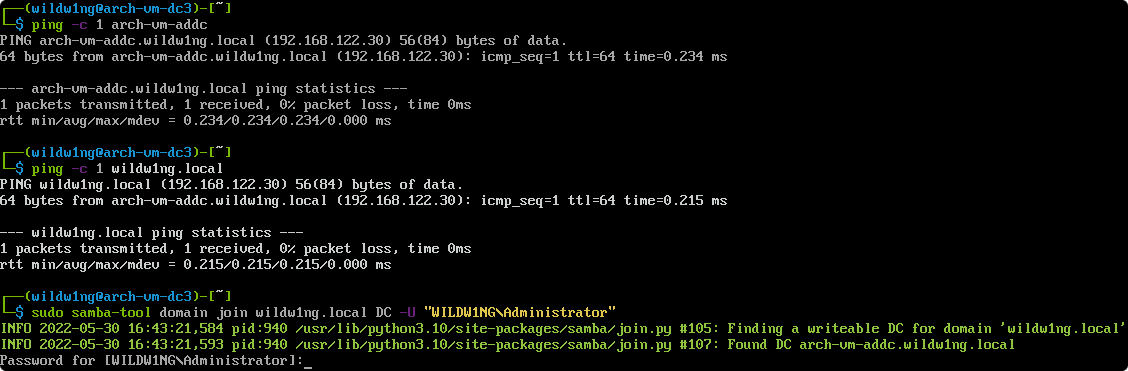
Testing the installation
Verify tcp-based _ldap SRV record in the domain

host -t SRV _ldap._tcp.wildw1ng.local
Verify udp-based _kerberos SRV resource record in the domain

host -t SRV _kerberos._udp.wildw1ng.local
Verify A record of the domain controller

host -t A arch-vm-addc.wildw1ng.local
Verify NT password authentication

smbclient //localhost/netlogon -U Administrator -c 'ls'
Verify Kerberos is working as expected

kinit Administrator@wildw1ng.local
Note
If the “KDC reply did not match expectations while getting initial credentials” error occurs, check your /etc/krb5.conf.
Ensure that all Realm names are in upper case letters.
List cached Kerberos tickets

Use smbclient with acquired ticket

smbclient //arch-vm-addc/netlogon -k -c 'ls'
DNS reverse lookup
Create a reverse lookup zone for each subnet in your environment in DNS.
It is important that this is kept in Samba’s DNS as opposed to BIND to allow for dynamic updates by clients.
Use the first three octets of the subnet in reverse order (for example: 192.168.0.0/24 becomes 0.168.192)
Create a reverse lookup zone for each subnet
samba-tool dns zonecreate arch-vm-addc.wildw1ng.local 122.168.192.in-addr.arpa -U Administrator
Add a record for you server (if your server is multi-homed, add for each subnet).
Add the fourth octet of the IP for the server.
samba-tool dns add arch-vm-addc.wildw1ng.local 122.168.192.in-addr.arpa 30 PTR arch-vm-addc.wildw1ng.local -U Administrator
Verify the lookup

host -t PTR 192.168.122.30
Verify the file server

smbclient -L localhost -N
Enable services
read more…
Manage roaming user profiles
Windows RSAT tools on Windows Client
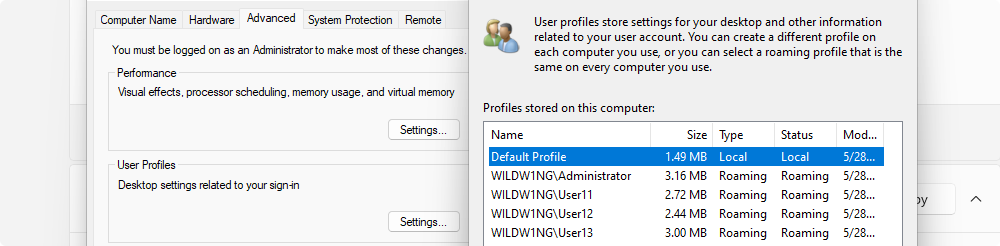
Use ‘Active Directory Users and Computers’ application on a Windows client to set the path to the user’s roaming profile and shared home directory.
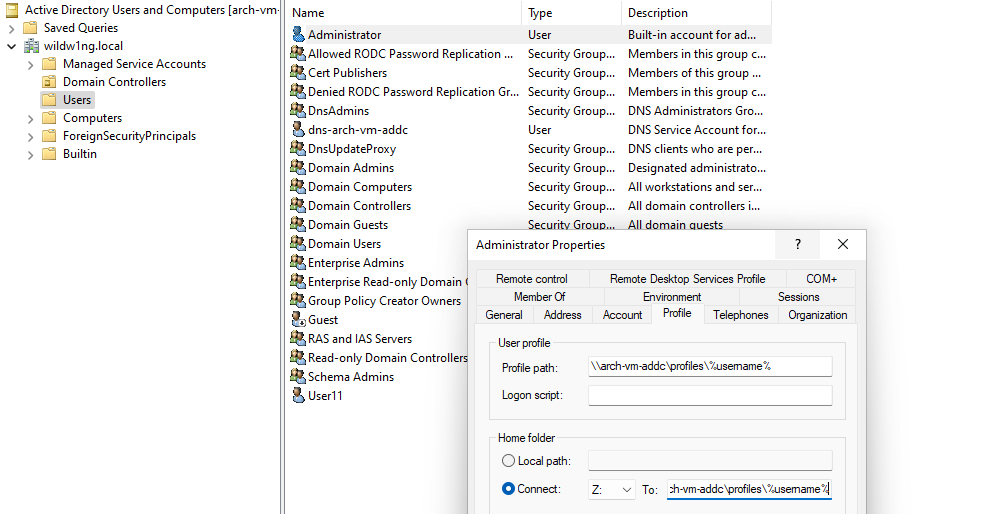
User profile \\arch-vm-addc\profiles\%username%
Home folder \\arch-vm-addc\shared\%username%
| Windows client OS sersion |
Windows Server OS version |
Profile suffix |
Profile directory name |
| Windows NT 4.0 - Windows Vista |
Windows NT Server 4.0 - Windows Server 2008 |
none |
user |
| Windows 7 |
Windows Server 2008 R2 |
V2 |
user.V2 |
| Windows 8.0 - 8.1* |
Windows Server 2012 - 2012 R2* |
V3 |
user.V3 |
| Windows 8.1* |
Windows Server 2012 R2* |
V4 |
user.V4 |
| Windows 10 (1507 to 1511) |
Windows Server 2016 |
V5 |
user.V5 |
| Windows 10 (1607 and later) |
|
V6 |
user.V6 |
Manage user profiles with Samba
samba-tool user create User11 Password11
 --use-username-as-cn --surname="User"
 --given-name="11" --initials=U11
 --mail-address=User11@wildw1ng.local
 --company="Company inc." --script-path=shire.bat
 --profile-path=\\\\arch-vm\\profiles\\User11
 --home-drive=Z
 --home-directory=\\\\arch-vm\\shared\\User11
 --job-title="Fancy title"
read more…
Manage group policies
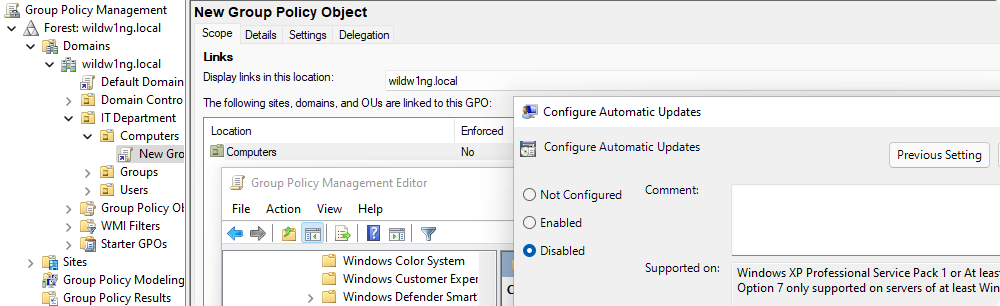 Samba policies can be found in the ‘Group Policy Management Editor’ within User or
Computer Configuration > Policies > Administrative Templates > Samba
For Samba Domain Controllers, the Password and Kerberos settings are also applied,
which are found in
Computer Configuration > Policies > OS Settings > Security Settings > Account Policy.


 Within the field Custom Server Access URL’s add
  Also make sure to change the Secure Connections setting to ‘Preferred’.